No Bake Oreo Dessert Cups
You know a dessert is going to be phenomenal when it uses Oreos. That’s why you must try these super easy No Bake Oreo Dessert Cups! The chocolatey crunchy goodness, layered with soft, creamy, and smooth filling, made into fancy little cups is the perfect dessert for all occasions!
Within only 15 minutes, you’ll be able to create this easy, sweet, and delicate summer treat! It’s just…yum.
These Oreo Dessert Cups Are A Perfect Bliss!

Why This Should Be Your Go-To Dessert
This dessert is always there for me when I’m in the mood for something quick and delicious! It’s rich, full of flavor, and the best part is, it’s No bake! This means that your dessert will be ready in no time!
In addition, an Oreo cup is an individual size dessert, which means it requires a lot less effort to prepare, especially when you want a nice mini option to share without having to cut into something, and who wouldn’t want that?
An Oreo cup is also full of two delicious things – cheesecake and Oreos, almost every one’s favorite!
Plus, these mini cheesecake cups are perfect during family gatherings, graduation parties, or even a simple cozy night. Trust me, this treat has your back!
A Fun Twist On This Easy Recipe
Oreos are a delightful mouth watering explosion of joy that make your tastebuds tingle with excitement! Add to that, they’re so versatile and can be turned into all kinds of sweet satisfying desserts! One of which is my personal favorite, and that is Oreo ice cream.
You can substitute the creamcheese cream layer with Oreo ice cream. It’ll give you a refreshing sensation perfect for summer time!
In order to prepare Oreo ice cream, whip two cups of cold heavy whipping cream using an electric mixer until stiff peaks form. Next, add one can of sweetened condensed milk and beat on low speed until everything is incorporated.
Add in some Oreo chunks then place in a container and pop into the fridge for at least 6 hours.
A Heavenly Dessert

Have Some Extra Whipped Cream? Try This
Whether you have some leftover whipped cream or cheesecake filling, there’s always something to come up with!
Whipped cream never fails to impress whenever I need something to decorate my desserts with. It’s so versatile that it partners really well with pretty much everything!
When left with a batch of whipped cream, use it to top your favorite drinks! Don’t worry, nothing will go to waste. Drop those swirls on top of hot chocolate, milkshakes, pancakes, cupcakes, or even French toast to make your breakfast more indulgent!
You could also create another version of these mini cups using Biscoff Lotus Biscuits. Make No Bake Lotus Biscoff Cheesecake Cups and enjoy with your loved ones. Crushed Biscoff biscuit crust is topped with a delectable cookie butter-flavored no-bake cheesecake filling, all packed into adorable little individual servings which you can serve at your special occasions.
Frequently Asked Questions
You can use Chantilly Cream, which is sweetened whipping cream with vanilla added. So make sure you don’t add too much sugar, and keep in mind that you’ll get a lighter result.
These Oreo cups last up to 5 days in the fridge.
If you’re making this during summer time, you might want to pop your filling into the fridge before you start assembling the Oreo cups.
Tips and Tricks
- If you want an extra LARGE serving you can replace the cups with a glass Pyrex baking dish or a round cheesecake pan.
- Crush the Oreo biscuits by hand and mix them into the whipped cream filling if you’re in the mood for some crunch!
- Cream cheese should be at room temperature. Avoid using use cream cheese straight from the refrigerator. For the best results, use full-fat cream cheese.
- If you like more filling, you can place a layer of crushed Oreos at the bottom of the cup then just pipe the whipped cream into a big swirl until you reach the top of the cup, where you can sprinkle some Oreo crumbs.
- For a more chocolatey flavor, drizzle the whipped cream layer with chocolate syrup.
- Use a piping bag to fill the creamcheese in the cups for a more elegant look.
- Make sure to sift the cocoa powder and the powdered sugar before adding it to the whipped cream so you don’t get lumps.
- I recommend you prepare the whipped cream ahead of time so that it firms up by the time you start assembling.
- To enhance the chocolate flavor, mix a teaspoon of instant coffee with warm water, wait a few minutes, then add it to the whipped cream.
Ingredients
- Oreos
- Cream cheese at room temperature
- Cold heavy whipping cream
- Vanilla extract
- Salt
- Powdered sugar
- Unsweetened cocoa powder
How to prepare Oreo Dessert Cups
Prepare the Oreo Base

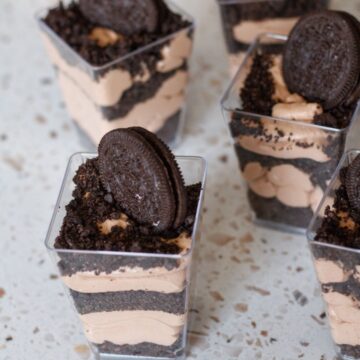
First, using a food processor, crush the Oreo cookies. Divide evenly between 8 serving cups with about one tablespoon in each. Set aside.
Make The Chocolate Cream Filling

Then, using a hand mixer, whip the cream cheese until soft and fluffy, then add heavy whipping cream, vanilla extract, salt, powdered sugar, and unsweetened cocoa powder. Whip again until smooth and stiff peaks form.
After that, add the whipped cream to a piping bag and carefully pour about ¼ cup of the mixture into the prepared cups. Next, add another layer of crushed Oreos and a layer of whipped cream.

Lastly, top with more crushed Oreos. Chill for 3 hours and enjoy these Oreo Dessert Cups with your loved ones!
Other recipes you might enjoy:
- Make No Bake Lotus Biscoff Cheesecake Cups
- Homemade Luqaimat (Awamat / Lokma)
- Klecha Recipe | Date cookies (كليجة)
- Rolled Baklava – Walnut Baklava Rolls
- No-Bake Nescafe Cake
- Red velvet cookies using cake mix
- Recipe for carrot cake with pineapple
- How to Make Attar | Middle Eastern Simple Syrup | القطر
- Warbat Bil Ashta (Shaabiyat Dessert)
- Zlabia (Easy Jalebi Recipe)
If you’ve tried this recipe or any other recipe on Sourandsweets, don’t forget to rate the recipe and leave me a comment below! I would love to hear about your experience with my recipes. Please share it with me on Instagram.
No Bake Oreo Dessert Cups
Equipment

Ingredients
- 16-18 oreos crushed
- 4 oz cream cheese at room temperature
- 2 ½ cups heavy whipping cream cold
- 1 tsp vanilla extract
- pinch of salt
- 1 cup powdered sugar
- ¼ cup unsweetened cocoa powder
Instructions
- In your food processor, crush Oreo cookies. Divide evenly between 8 serving cups (about one tablespoon per serving cup). Set aside.
- Using a hand mixer, whip the cream cheese until soft and fluffy. Add heavy whipping cream, vanilla extract, salt, powdered sugar, and unsweetened cocoa powder. Whip again until smooth and stiff peaks form.
- Add the whipped cream to a piping bag and carefully pour about ¼ cup of the mixture into the prepared cups. Next, add another layer of crushed Oreos and a layer of whipped cream.
- Lastly, top with more crushed Oreos. Chill for 3 hours and serve.


There is way too much sugar in this dessert, when I made it, it was not edible, half of the sugar would have been enough. And I like sweet desserts.
Hello Lucie. You can always adjust the sweetness to your liking. Feel free to use less sugar if you find it very sweet.:)
OH MY GOODNESS!!! I made these for our families annual women’s wellness weekend. I can’t wait to have a massage and one of these… HEAVEN!
I loved this recipe as did my guests. I had to make some modifications based on what I had on hand and it still was delicious.
Mods:
Only had 2 cups whipping cream on hand.
Used 3/4 cup powdered sugar to cut some of the sweetness down.
Used unsweetened dark chocolate cocoa powder.
These were gone 5 minutes after I out them out!
Can I make the cream part the day before?
Yes you can.
How many hour before the event you recommend making them ? And how long they can be with out refrigeration?
You can make them the day before your event and they can be left out for about 2 hours. its the best to serve them cold.